
Post by Akira on Jul 22, 2007 8:23:06 GMT -4
Compression
Hello and welcome to this guide to compression. Compression is an effect that many people overlook, sometimes because they simply don’t know where to start or how to operate a compressor; hopefully this guide will give you a good insight into how a compressor works.
What is compression?
The simplest explanation for a compressor is that it “evens out” your playing by making loud notes quieter and quiet notes louder. Ok, now you know what a compressor is, you’re all set to go, right? No? Ah, ok, guess I should explain how exactly a compressor works and how to get the best out of your compressor.
Where is compression used?
Everywhere!! A lot of guitarists use a compressor pedal or a rack mount compressor in their rig. Bassists do too. But it doesn’t just stop there. In a studio compression is used on everything pretty much, seriously! And once they’re done compressing and mixing everything, they’ll add some more compression when they master the mix! So I guess you’re wondering what’s the big deal with compression is… well, here goes…
How does compression work?
A recordings dynamic range is the difference between its loudest and quietest levels. A recordings dynamic level can alter your perception of the recording quite a lot; recordings with a wide dynamic range are often more interesting and dramatic.
However too wide a dynamic range can cause problems for a listener, such as in a classical music recording where big orchestras are used. You don’t want to struggle to hear the intricate solo violin section and then have your ears imploded when the whole orchestra comes in – so here is where a compressor would come in.
The best way to explain how a compressor works would be by using a VST plug-in compressor as an example, rather than a compressor pedal. VST compressors usually have more controls; this isn’t a bad thing, it actually makes it easier to understand in the long run. Here’s what you will typically be faced with when you open a compressor VST plug-in:
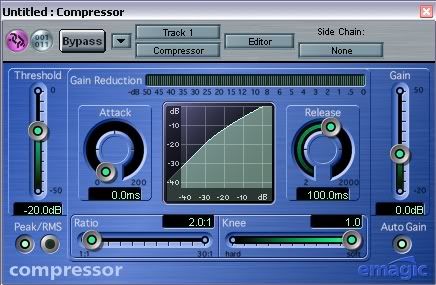
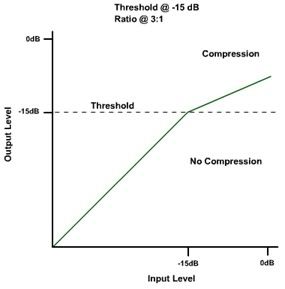
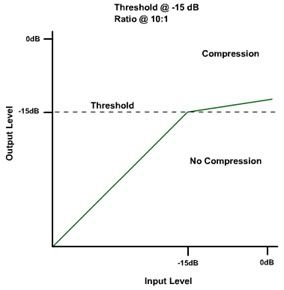
A compressor measures the Input Signal Level and then reduces the strength of the level. This is expressed in the form of a Compression Ratio. For example, a ratio of 3:1 would mean that the output signal would increase by only one dB (decibel) for every 3dB input once a certain threshold is exceeded.
A compressors Threshold setting determines at which point compression is applied. If the input signal exceeds this threshold then compression will be applied, if the signal does not exceed this threshold then the signal will go by unaffected.
The following two diagrams show how the Compression Ratio affects the signal. A 10:1 ratio has a much larger effect and compresses the signal much more than a 3:1 ratio.
Of course, signal levels can change very quickly so it is important for the compressor to react appropriately; too quick and the signal will sound un-natural, too slow and the level increase will inadvertently pass through and you will hear the compression “breathing” as it cuts in too late. Thus an Attack setting controls how quickly the compressor responds.
A similar setting, Release is used to keep the compression applied for an adjustable amount of time after the level drops back below the threshold level.
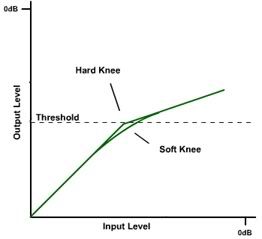
Believe it or not, compressors have knees. Yes, they do. The “Knee” is used to describe the transition from “no compression” to “compression”. A quick transition would be a “hard” knee, and a more gradual transition would be a “soft” knee. A soft knee tends to be more subtle and transparent.
As you compress the signal, it often appears to be quieter than before; this is because you are taking out the peaks of the signal. To make up for this there is an Output Gain setting. This allows you to make the compressed signal louder. Overall this means you can make the signal louder than before as there’s no high peaks in the signal to produce clipping. However don’t be too enthusiastic with the Output Gain as you can still produce clipping if you push it up too far. Output Gain is often called “Make-up Gain”.
Uses in the studio
Examples of compressors being used in the studio include: applying a compressor to the track when recording a vocalist in case they move away from the mic. This could also be done after recording. In fact you can do this to pretty much anything and everything. If you think about it, by compressing the signal the transient peaks are reduced which in turn allows you to make the individual track louder. Compression is often applied to a whole track when mastering to make the mix sound more "together".
Uses for a guitarist
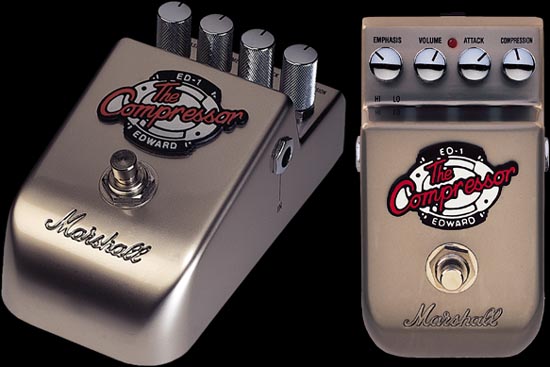
Using a compressor not only evens out your signal, but also adds more sustain to your signal because as the signal starts to diminish the compressor, depending on how it’s set, will boost the level of the signal. A compressor in the studio and in a pedal on your pedal board can appear in a slightly different interface but nevertheless they do the same thing. For example, on a Marshall “Ed the compressor”, the controls are:
“Emphasis”
“Volume”
“Attack”
“Compression”
The emphasis function is something that is unique to this pedal. It allows you to target which frequencies you would like to compress more; high through to low frequencies. I don’t know how much use this is as it doesn’t give specific frequency numbers, but in general it gives you the option of tightening up your top end or bottom end depending on how your tone sounds.
The Volume knob allows you to alter the signal level after it’s been compressed – like the make up gain feature I looked at earlier. The Attack knob is the same as the Attack function explained earlier. The Compression knob acts as an “all-in-one” control of the Compression Ratio and Threshold level.
On the MXR Dyna Comp there are only two controls: “Output”, and “Sensitivity”. The Output knob controls the compressed signal level, and the Sensitivity knob controls the Compression Ratio and Threshold level. There’s no attack control, which is disappointing as the attack is way too slow on this pedal.

The Keeley Compressor (which I use currently) has only two controls too. At least only two external controls. “Sustain” and “Level”. Sustain controls the Compression Ratio and the Threshold Level, and “Level” controls the compressed signal level. Inside the pedal there’s an Attack control, and a “Trim” control. The Trim control allows you to reduce distortions that may be present when you use the compressor with very high output humbuckers or if you use a booster before the compressor.

Conclusion
Compression can strengthen your sound but if used too much it can have the opposite effect. It is a great tool but be careful with how you use it. I hope you’ve found this guide useful and wish you all the best with your future endeavours with compression!

